磁盘: Raid 和 lvm
基本知识
存储系统的 I/O 栈架构

存储系统 I/O 的工作原理。
文件系统层,包括虚拟文件系统和其他各种文件系统的具体实现。它为上层的应用程序,提供标准的文件访问接口;对下会通过通用块层,来存储和管理磁盘数据。
通用块层,包括块设备 I/O 队列和 I/O 调度器。它会对文件系统的 I/O 请求进行排队,再通过重新排序和请求合并,然后才要发送给下一级的设备层。
设备层,包括存储设备和相应的驱动程序,负责最终物理设备的I/O操作。
磁盘
根据存储介质的不同,常见磁盘可以分为两类:机械磁盘和固态磁盘。
按照接口来分类,比如可以把硬盘分为 IDE(Integrated Drive Electronics)、SCSI(Small Computer System Interface) 、SAS(Serial Attached SCSI) 、SATA(Serial ATA) 、FC(Fibre Channel) 等。 不同的接口,往往分配不同的设备名称。比如, IDE 设备会分配一个 hd 前缀的设备名,SCSI和SATA设备会分配一个 sd 前缀的设备名。如果是多块同类型的磁盘,就会按照a、b、c等的字母顺序来编号
按照不同的使用方式,又可以把它们划分为多种不同的架构。
- 直接作为独立磁盘设备.
- 把多块磁盘组合成一个逻辑磁盘,构成冗余独立磁盘阵列,也就是RAID(Redundant Array of Independent Disks).
通用块层
其实是处在文件系统和磁盘驱动中间的一个块设备抽象层。它主要有两个功能 。
第一个功能跟虚拟文件系统的功能类似。向上,为文件系统和应用程序,提供访问块设备的标准接口;向下,把各种异构的磁盘设备抽象为统一的块设备,并提供统一框架来管理这些设备的驱动程序。
第二个功能,通用块层还会给文件系统和应用程序发来的 I/O 请求排队,并通过重新排序、请求合并等方式,提高磁盘读写的效率
文件系统层
文件系统,本身是对存储设备上的文件,进行组织管理的机制。组织方式不同,就会形成不同的文件系统。
为了支持各种不同的文件系统,Linux内核在用户进程和文件系统的中间,又引入了一个抽象层,也就是虚拟文件系统VFS(Virtual File System)。
文件系统可以分为三类。
第一类是基于磁盘的文件系统,也就是把数据直接存储在计算机本地挂载的磁盘中。常见的Ext4、XFS、OverlayFS等,都是这类文件系统。
第二类是基于内存的文件系统,也就是我们常说的虚拟文件系统。这类文件系统,不需要任何磁盘分配存储空间,但会占用内存。我们经常用到的 /proc 文件系统,其实就是一种最常见的虚拟文件系统。此外,/sys 文件系统也属于这一类,主要向用户空间导出层次化的内核对象。
第三类是网络文件系统,也就是用来访问其他计算机数据的文件系统,比如NFS、SMB、iSCSI等
PCI(Peripheral Component Interconnect 外围设备互联)

Intel在1992年提出PCI(Peripheral Component Interconnect)总线协议,PCI是一种外设总线规范。 总线:总线是一种传输信号的路径或信道。典型情况是,总线是连接于一个或多个导体的电气连线,总线上连接的全部设备可在同一时间收到全部的传输内容。 总线由电气接口和编程接口组成。
Linux PCI设备驱动实际包括Linux PCI设备驱动和设备本身驱动两部分。 PCI有三种地址空间:PCI I/O空间、PCI内存地址空间和PCI配置空间。 其中,PCI I/O空间和PCI内存地址空间由设备驱动程序使用,而PCI配置空间由Linux PCI初始化代码使用,用于配置PCI设备,比如中断号以及I/O或内存基地址。
/proc/iomem 描写叙述了系统中全部的设备I/O在内存地址空间上的映射。
有三个部分组成:
- Bus Number:8 bits,也就是最多256条总线
- Device Number:5 bits,也就是最多32个设备
- Function Number:3 bits,也就是最多8个功能
我们常说的BDF,它类似于网络中的IP地址,一般写作BB:DD.F的格式。
一个PCI设备 40000000-400003ff : 0000:00:1f.1 解释
- 40000000-400003ff是它所映射的内存地址空间,占领了内存地址空间的1024 bytes的位置,而
- 0000:00:1f.1 则是一个PCI外设的地址,它以冒号和逗号分隔为4个部分,第一个16位表示域,第二个8位表示一个总线编号,第三个5位表示一个设备号,最后是3位,表示功能号. PCI设备的地址格式为<总线号>:<插槽号>.<功能号>
由于默认BDF的方式最多只支持8个Function,可能不够用,所以PCIe还支持另一种解析方式,叫做ARI(Alternative Routing-ID Interpretation),它将Device Number和Function Number合并为一个8bit的字段,只用于表示Function,所以最多可以支持256个Function.
一般一类设备在出厂的时候会有相同的一串classid,而classid记录在/sys/bus/pci/devices/*/class文件中
# lspci help
Usage: lspci [<switches>]

Basic display modes:
-mm             Produce machine-readable output (single -m for an obsolete format)
-t              Show bus tree

Display options:
-v              Be verbose (-vv or -vvv for higher verbosity)
-k              Show kernel drivers handling each device
-x              Show hex-dump of the standard part of the config space
-xxx            Show hex-dump of the whole config space (dangerous; root only)
-xxxx           Show hex-dump of the 4096-byte extended config space (root only)
-b              Bus-centric view (addresses and IRQ's as seen by the bus)
-D              Always show domain numbers
-P              Display bridge path in addition to bus and device number
-PP             Display bus path in addition to bus and device number

Resolving of device ID's to names:
-n              Show numeric ID's
-nn             Show both textual and numeric ID's (names & numbers)
-q              Query the PCI ID database for unknown ID's via DNS
-qq             As above, but re-query locally cached entries
-Q              Query the PCI ID database for all ID's via DNS

Selection of devices:
-s [[[[<domain>]:]<bus>]:][<slot>][.[<func>]]   Show only devices in selected slots
-d [<vendor>]:[<device>][:<class>]              Show only devices with specified ID's

Other options:
-i <file>       Use specified ID database instead of /usr/share/hwdata/pci.ids
-p <file>       Look up kernel modules in a given file instead of default modules.pcimap
-M              Enable `bus mapping' mode (dangerous; root only)

PCI access options:
-A <method>     Use the specified PCI access method (see `-A help' for a list)
-O <par>=<val>  Set PCI access parameter (see `-O help' for a list)
-G              Enable PCI access debugging
-F <file>       Read PCI configuration dump from a given file
PCI 总线缺陷
(1)由于采用了基于总线的共享传输模式,在PCI总线上不可能同时传送两组以上的数据,当一个PCI设备占用总线时,其他设备只能等待;
(2)随着总线频率从33MHz提高到66MHz,甚至133MHz(PCI-X),信号线之间的相互干扰变得越来越严重,在一块主板上布设多条总线的难度也就越来越大;
(3)由于PCI设备采用了内存映射I/O地址的方式建立与内存的联系,热添加PCI设备变成了一件非常困难的工作。目前的做法是在内存中为每一个PCI设备划出一块50M到100M的区域,这段空间用户是不能使用的,因此如果一块主板上支持的热插拔PCI接口越多,用户损失的内存就越多;
(4)PCI的总线上虽然有buffer作为数据的缓冲区,但是它不具备纠错的功能,如果在传输的过程中发生了数据丢失或损坏的情况,控制器只能触发一个NMI中断通知操作系统在PCI总线上发生了错误
PCIe(Peripheral Component Interconnect Express)

一种用于连接外设的总线。它于2003年提出来,作为替代PCI和PCI-X (Peripheral Component Interconnect eXtended)的方案,现在已经成了现代CPU和其他几乎所有外设交互的标准或者基石.
PCIe和PCI最大的改变是由并行改为串行,通过使用差分信号传输(differential transmission).
比如 GPU,网卡,USB控制器,声卡,网卡等等,这些都是通过PCIe总线进行连接的,然后现在非常常见的基于m.2接口的SSD,也是使用NVMe协议,通过PCIe总线进行连接的, 除此以外,Thunderbolt 3 ,USB4,甚至最新的CXL互联协议 ,都是基于PCIe的!
PCIE与PCI直通的区别是:PCI只能直通给某个特定的虚拟机,而PCIE有可能可以给多个虚拟机用,如具有SR-IOV功能的PCIE设备,通过在HOST上抽象出多个的VF,每个VF再通过VFIO直通给虚拟机,最终的表现就是一个物理PCIE网卡可以直通给多个虚拟机用; SR-IOV是针对PCIE设备的,PCI设备理论上不具有SR-IOV功能.
NVMe(Non-Volatile Memory Express)

接口:也就是设备如何与计算机通信。常见的存储设备接口包括:

SATA接口: 通常用于2.5寸和3.5寸硬盘,有时候一些M.2设备也会使用
PCI Express(PCIe)接口: 用于M.2和PCIe设备
协议:定义了如何在计算机与设备之间传输数据。常见的协议包括:
用于SATA接口的 AHCI 或者 ATA 协议
NVMe over PCIe: 用于PCIe接口的NVMe协议
在SATA中计算机与存储设备只能有一个队列,即使是多CPU情况下,所有请求只能经过这样一个狭窄的道路。 而NVMe协议可以最多有64K个队列,每个CPU或者核心都可以有一个队列,这样并发程度大大提升,性能也自然更高了。
# 查看传输协议

# sas 企业级服务器
$ lsblk -d -o NAME,MODEL,TRAN
NAME MODEL          TRAN
sda  LOGICAL_VOLUME sas
sdb  LOGICAL_VOLUME sas

# nvme AI/大数据
$ lsblk -d -o NAME,MODEL,TRAN
NAME    MODEL               TRAN
sda     MR9440-8i
nvme0n1 INTEL SSDPE2KE032T8 nvme
nvme2n1 INTEL SSDPE2KE032T8 nvme
nvme1n1 INTEL SSDPE2KE032T8 nvme
nvme3n1 INTEL SSDPE2KE032T8 nvme
nvme4n1 INTEL SSDPE2KE032T8 nvme
nvme5n1 INTEL SSDPE2KE032T8 nvme

# SATA (Serial ATA) 普通消费级 PC
root@node1:~# lsblk -d -o NAME,MODEL,TRAN
NAME  MODEL                          TRAN
fd0
loop0
loop1
loop2
loop3
loop4
sda   Virtual disk                   spi
sr0   VMware Virtual SATA CDRW Drive sata
TRAN 表示磁盘的传输接口协议,常见的值有
sata → 传统 SATA 硬盘或 SSD
nvme → NVMe 协议的 SSD
sas → Serial Attached SCSI(串行连接 SCSI)
nvme-cli 命令
# 安装
$ yum install nvme-cli

[root@master-01 ~]# nvme
nvme-1.8.1
usage: nvme <command> [<device>] [<args>]

The '<device>' may be either an NVMe character device (ex: /dev/nvme0) or an
nvme block device (ex: /dev/nvme0n1).

The following are all implemented sub-commands:
  list                  List all NVMe devices and namespaces on machine
  list-subsys           List nvme subsystems
  id-ctrl               Send NVMe Identify Controller
  id-ns                 Send NVMe Identify Namespace, display structure
  list-ns               Send NVMe Identify List, display structure
  ns-descs              Send NVMe Namespace Descriptor List, display structure
  id-nvmset             Send NVMe Identify NVM Set List, display structure
  create-ns             Creates a namespace with the provided parameters
  delete-ns             Deletes a namespace from the controller
  attach-ns             Attaches a namespace to requested controller(s)
  detach-ns             Detaches a namespace from requested controller(s)
  list-ctrl             Send NVMe Identify Controller List, display structure
  get-ns-id             Retrieve the namespace ID of opened block device
  get-log               Generic NVMe get log, returns log in raw format
  telemetry-log         Retrieve FW Telemetry log write to file
  fw-log                Retrieve FW Log, show it
  changed-ns-list-log   Retrieve Changed Namespace List, show it
  smart-log             Retrieve SMART Log, show it
  ana-log               Retrieve ANA Log, show it
  error-log             Retrieve Error Log, show it
  effects-log           Retrieve Command Effects Log, show it
  endurance-log         Retrieve Endurance Group Log, show it
  get-feature           Get feature and show the resulting value
  device-self-test      Perform the necessary tests to observe the performance
  self-test-log         Retrieve the SELF-TEST Log, show it
  set-feature           Set a feature and show the resulting value
  set-property          Set a property and show the resulting value
  get-property          Get a property and show the resulting value
  format                Format namespace with new block format
  fw-commit             Verify and commit firmware to a specific slot (fw-activate in old version < 1.2)
  fw-download           Download new firmware
  admin-passthru        Submit an arbitrary admin command, return results
  io-passthru           Submit an arbitrary IO command, return results
  security-send         Submit a Security Send command, return results
  security-recv         Submit a Security Receive command, return results
  resv-acquire          Submit a Reservation Acquire, return results
  resv-register         Submit a Reservation Register, return results
  resv-release          Submit a Reservation Release, return results
  resv-report           Submit a Reservation Report, return results
  dsm                   Submit a Data Set Management command, return results
  flush                 Submit a Flush command, return results
  compare               Submit a Compare command, return results
  read                  Submit a read command, return results
  write                 Submit a write command, return results
  write-zeroes          Submit a write zeroes command, return results
  write-uncor           Submit a write uncorrectable command, return results
  sanitize              Submit a sanitize command
  sanitize-log          Retrieve sanitize log, show it
  reset                 Resets the controller
  subsystem-reset       Resets the subsystem
  ns-rescan             Rescans the NVME namespaces
  show-regs             Shows the controller registers or properties. Requires character device
  discover              Discover NVMeoF subsystems
  connect-all           Discover and Connect to NVMeoF subsystems
  connect               Connect to NVMeoF subsystem
  disconnect            Disconnect from NVMeoF subsystem
  disconnect-all        Disconnect from all connected NVMeoF subsystems
  gen-hostnqn           Generate NVMeoF host NQN
  dir-receive           Submit a Directive Receive command, return results
  dir-send              Submit a Directive Send command, return results
  virt-mgmt             Manage Flexible Resources between Primary and Secondary Controller
  version               Shows the program version
  help                  Display this help

See 'nvme help <command>' for more information on a specific command

The following are all installed plugin extensions:
  intel           Intel vendor specific extensions
  lnvm            LightNVM specific extensions
  memblaze        Memblaze vendor specific extensions
  wdc             Western Digital vendor specific extensions
  huawei          Huawei vendor specific extensions
  netapp          NetApp vendor specific extensions
  toshiba         Toshiba NVME plugin
  micron          Micron vendor specific extensions
  seagate         Seagate vendor specific extensions

# 列出系统所有NVMe SSD:设备名,序列号,型号,namespace,使用量,LBA格式,firmware版本
$ nvme list
Node          SN              Model                       Namespace Usage                  Format          FW Rev
------------- --------------- --------------------------- --------- ---------------------- --------------- --------
/dev/nvme0n1  S676NF0R908202  SAMSUNG MZVL21T0HCLR-00B00  1         0.00   B /   1.02  TB  512   B +  0 B  GXA7401Q
/dev/nvme1n1  S676NF0R908214  SAMSUNG MZVL21T0HCLR-00B00  1         0.00   B /   1.02  TB  512   B +  0 B  GXA7401Q
/dev/nvme2n1  S676NF0R908144  SAMSUNG MZVL21T0HCLR-00B00  1         0.00   B /   1.02  TB  512   B +  0 B  GXA7401Q
udev–>Dynamic device management 设备管理工具
[root@master-01 ~]# man udev
udev 是 Linux 2.6 内核里的一个功能,它替代了原来的 devfs,成为当前 Linux 默认的设备管理工具。
udev机制是Linux kernel的设备管理机制. 当内核检测到设备插拔后, 会发送事件给用户态的udevd进程. 用户态udevd进程根据事件信息匹配不同规则从而进行不同的处理逻辑 udev规则文件的扩展名为.rules, 主要位于两个目录:
- /etc/udev/rules.d/: 自定义规则
- /usr/lib/udev/rules.d/ 或则 /usr/local/lib/udev/rules.d/ : 系统自带规则
- /run/udev/rules.d: 运行时规则目录
在规则文件里,除了以“#”开头的行(注释),所有的非空行都被视为一条规则,但是一条规则不能扩展到多行。 规则都是由多个 键值对(key-value pairs)组成,并由逗号隔开,键值对可以分为 条件匹配键值对( 以下简称“匹配键 match”) 和 赋值键值对( 以下简称“赋值键assignment ”),一条规则可以有多条匹配键和多条赋值键。 匹配键是匹配一个设备属性的所有条件,当一个设备的属性匹配了该规则里所有的匹配键,就认为这条规则生效,然后按照赋值键的内容,执行该规则的赋值。
[root@master-01 ~]# udevadm --help
udevadm [--help] [--version] [--debug] COMMAND [COMMAND OPTIONS]

Send control commands or test the device manager.

Commands:
  info          Query sysfs or the udev database
  trigger       Request events from the kernel
  settle        Wait for pending udev events
  control       Control the udev daemon
  monitor       Listen to kernel and udev events
  test          Test an event run
  test-builtin  Test a built-in command

# 重新加载规则文件
udevadm control --reload
udev 规则的 match 匹配键
ACTION: 事件 (uevent) 的行为,例如:add( 添加设备 )、remove( 删除设备 )。
KERNEL: 内核设备名称,例如:sda, cdrom。
DEVPATH:设备的 devpath 路径。
SUBSYSTEM: 设备的子系统名称,例如:sda 的子系统为 block。
BUS: 设备在 devpath 里的总线名称,例如:usb。
DRIVER: 设备在 devpath 里的设备驱动名称,例如:ide-cdrom。
ID: 设备在 devpath 里的识别号。
ENV{key}: 匹配设置属性。
PROGRAM:调用外部命令。
RESULT: 外部命令 PROGRAM 的返回结果
# 调用外部命令/lib/udev/scsi_id查询设备的SCSIID,如果返回结果为35000c50000a7ef67,则该设备匹配该匹配键
PROGRAM=="/lib/udev/scsi_id -g -s $devpath", RESULT=="35000c50000a7ef67"
udev 的重要 assignment赋值键
NAME:在 /dev下产生的设备文件名。只有第一次对某个设备的 NAME 的赋值行为生效,之后匹配的规则再对该设备的 NAME 赋值行为将被忽略。 如果没有任何规则对设备的 NAME 赋值,udev 将使用内核设备名称来产生设备文件。
SYMLINK:为 /dev/下的设备文件产生符号链接。由于 udev 只能为某个设备产生一个设备文件,所以为了不覆盖系统默认的 udev 规则所产生的文件,推荐使用符号链接。
OWNER, GROUP, MODE:为设备设定权限。
ENV{key}:设置设备属性
/dev/disk 目录
/dev/disk 目录在类 Unix 系统中是一个特殊的目录,用于组织和管理磁盘设备文件和它们的符号链接。这个目录提供了一种方便的方式来访问和识别系统中的磁盘设备,无论它们是如何连接或挂载的。以
在 Linux 系统中,/dev/disk 目录下的 by-* 文件夹是 udev 规则创建的符号链接
LVM 精简卷(Thinly-Provisioned Logical Volumes)

在创建Thin“瘦”卷时,预分配一个虚拟的逻辑卷容量大小,而只是在实际写入数据时才分配物理空间给这个卷。 这样我们可以轻易的创建出总逻辑容量超出物理磁盘空间的多个“精简卷”,而无须为将来可能达到的数据量提前“买单”。 在应用产生的数据确实需要增加驱动器时,我们也可以灵活地在线调整卷的大小。
前置条件,
# 确认模块是否加载
root@node1:~# lsmod | grep dm_thin_pool
dm_thin_pool           90112  0
dm_persistent_data    118784  1 dm_thin_pool
dm_bio_prison          28672  1 dm_thin_pool
如果为空,openebs/lvm-driver:1.7.0 会报错 thin: Required device-mapper target(s) not detected in your kernel.
如果没有,则加载模块:
modprobe dm_thin_pool
dmsetup(Device mapper setup 管理硬盘映射器)
dmsetup命令是Linux系统平台中一个更加底层的逻辑卷管理工具,能够轻松从设备底层管理LVM逻辑卷管理器中各个设备卷,如果用lvcreate和lvremove无法正常对逻辑卷进行管理了,那么则可以用dmsetup试一下
dmsetup ls #列出所有逻辑设备

dmsetup status # 列出所有逻辑设备的状态信息

dmsetup remove # 移除逻辑设备
基本命令
lsblk (list block)
列出所有可用块设备的信息,而且还能显示他们之间的依赖关系,但是它不会列出RAM盘的信息。块设备有硬盘,闪存盘,cd-ROM等等。
# lsblk 命令默认情况下将以树状列出所有块设备
$ lsblk

NAME   MAJ:MIN rm   SIZE RO type mountpoint
sda      8:0    0 232.9G  0 disk
├─sda1   8:1    0  46.6G  0 part /
├─sda2   8:2    0     1K  0 part
├─sda5   8:5    0   190M  0 part /boot
├─sda6   8:6    0   3.7G  0 part [SWAP]
├─sda7   8:7    0  93.1G  0 part /data
└─sda8   8:8    0  89.2G  0 part /personal
sr0     11:0    1  1024M  0 rom
blkid (block id)
选项
-c <file>   指定cache文件(default: /etc/blkid.tab, /dev/null = none)
-d          don't encode non-printing characters
-h          显示帮助信息
-g          garbage collect the blkid cache
-o <format> 指定输出格式
-k          list all known filesystems/RAIDs and exit
-s <tag>    显示指定信息,默认显示所有信息
-t <token>  find device with a specific token (NAME=value pair)
-l          look up only first device with token specified by -t
-L <label>  convert LABEL to device name
-U <uuid>   convert UUID to device name
-v          显示版本信息
-w <file>   write cache to different file (/dev/null = no write)
<dev>       specify device(s) to probe (default: all devices)
Low-level probing options:
-p          low-level superblocks probing (bypass cache)
-i          gather information about I/O limits
-S <size>   overwrite device size
-O <offset> probe at the given offset
-u <list>   filter by "usage" (e.g. -u filesystem,raid)
-n <list>   filter by filesystem type (e.g. -n vfat,ext3)
// https://github.com/kubernetes/kubernetes/blob/326d4ce072b1176a239f534cf3e961a1f8beea1a/staging/src/k8s.io/mount-utils/mount_linux.go
func getDiskFormat(exec utilexec.Interface, disk string) (string, error) {
	args := []string{"-p", "-s", "TYPE", "-s", "PTTYPE", "-o", "export", disk}
	klog.V(4).Infof("Attempting to determine if disk %q is formatted using blkid with args: (%v)", disk, args)
	dataOut, err := exec.Command("blkid", args...).CombinedOutput()
	output := string(dataOut)
	klog.V(4).Infof("Output: %q", output)

	if err != nil {
		// ...
	}

	var fstype, pttype string

	lines := strings.Split(output, "\n")
	for _, l := range lines {
		if len(l) <= 0 {
			// Ignore empty line.
			continue
		}
		cs := strings.Split(l, "=")
		if len(cs) != 2 {
			return "", fmt.Errorf("blkid returns invalid output: %s", output)
		}
		// TYPE is filesystem type, and PTTYPE is partition table type, according
		// to https://www.kernel.org/pub/linux/utils/util-linux/v2.21/libblkid-docs/.
		if cs[0] == "TYPE" {
			fstype = cs[1]
		} else if cs[0] == "PTTYPE" {
			pttype = cs[1]
		}
	}

	if len(pttype) > 0 {
		klog.V(4).Infof("Disk %s detected partition table type: %s", disk, pttype)
		// Returns a special non-empty string as filesystem type, then kubelet
		// will not format it.
		return "unknown data, probably partitions", nil
	}

	return fstype, nil
}
parted
fdisk,gdisk,parted 三种分区工具比较
- fdisk 只能用于MBR分区,gdisk,parted可以用于GPT分区。
- parted 命令在创建删除分区使用命令比较方便,但是功能不是太完善,没有备份还原命令。
- gdisk 在分区上命令和fdisk风格一样, 使用方便,学习难度低且功能强大,推荐使用。
[root@centos7 mnt]$ parted --help
Usage: parted [OPTION]... [DEVICE [COMMAND [PARAMETERS]...]...]
Apply COMMANDs with PARAMETERS to DEVICE.  If no COMMAND(s) are given, run in
interactive mode.

OPTIONs:
  -h, --help                      displays this help message
  -l, --list                      lists partition layout on all block devices
  -m, --machine                   displays machine parseable output
  -s, --script                    never prompts for user intervention
  -v, --version                   displays the version
  -a, --align=[none|cyl|min|opt]  alignment for new partitions

COMMANDs:
  align-check TYPE N                        check partition N for TYPE(min|opt)
        alignment
  help [COMMAND]                           print general help, or help on
        COMMAND
  mklabel,mktable LABEL-TYPE               create a new disklabel (partitionM                       # 设置分区类型 详细使用man获取
        table)
  mkpart PART-TYPE [FS-TYPE] START END     make a partition                                         # 创建一个分区 start,end为M,详细信息使用man获取
  name NUMBER NAME                         name partition NUMBER as NAME
  print [devices|free|list,all|NUMBER]     display the partition table,                             # 打印信息
        available devices, free space, all found partitions, or a particular
        partition
  quit                                     exit program                                             # 退出
  rescue START END                         rescue a lost partition near START                       # 救援一个丢失的分区
        and END
  rm NUMBER                                delete partition NUMBER                                  # 删除一个分区
  select DEVICE                            choose the device to edit                                # 选择一个分区去编辑
  disk_set FLAG STATE                      change the FLAG on selected device                       # 改变选择分区的标记
  disk_toggle [FLAG]                       toggle the state of FLAG on selected                     # 切换选择分区的标记
        device
  set NUMBER FLAG STATE                    change the FLAG on partition NUMBER                      # 改变指定分区号的标记
  toggle [NUMBER [FLAG]]                   toggle the state of FLAG on partition                    # 切换指定分区号的标记
        NUMBER
  unit UNIT                                set the default unit to UNIT                             # 设置默认单位
  version                                  display the version number and                           # 显示版本
        copyright information of GNU Parted

Report bugs to bug-parted@gnu.org
分区类型
- primary:主分区
- logical:逻辑分区
- extended:扩展分区
GPT分区 /dev/sdb1分区类型为Linux LVM,大小为30G /dev/sdb2分区类型为swap,大小为20G /dev/sdb3分区类型为Linux,大小为10G /dev/sdb4分区类型为linux,大小为10G 保留40G留作后用
[root@centos7 mnt]$ parted -s /dev/sdb mklabel gpt
[root@centos7 mnt]$ parted -s /dev/sdb unit GB mkpart primary 1 30 set 1 lvm on
[root@centos7 mnt]$ parted -s /dev/sdb unit GB mkpart primary 30 50 set 2 swap on
[root@centos7 mnt]$ parted -s /dev/sdb unit GB mkpart primary 50 60
[root@centos7 mnt]$ parted -s /dev/sdb unit GB mkpart primary 60 70
[root@centos7 mnt]$ parted -s /dev/sdb print
fuser - identify processer using files or sockets
fuser 可以显示出当前哪个程序在使用磁盘上的某个文件、挂载点、甚至网络端口,并给出程序进程的详细信息。
# 显示使用某个文件的进程信息 在umount的时候很有用,可以找到还有哪些用到这个设备了。
# 比如 lvremove -f /dev/sda2 报错 Logical volume /dev/sda2 contains a filesystem in use.
$ fuser --user --mount /dev/sda2 --kill --interactive
/dev/sda2:            6378c(quietheart)  6534c(quietheart)  6628(quietheart)
6653c(quietheart)  7429c(quietheart)  7549c(quietheart)  7608c(quietheart)
lvm(Logical Volume Manager)
LVM是建立在硬盘和 分区之上的一个逻辑层,来提高磁盘分区管理的灵活性。 通过LVM系统管理员可以轻松管理磁盘分区,如:将若干个磁盘分区连接为一个整块的卷组 (volumeGroup),形成一个存储池。 管理员可以在卷组上随意创建逻辑卷组(logicalVolumes),并进一步在逻辑卷组上创建文件系 统。 管理员通过LVM可以方便的调整存储卷组的大小,并且可以对磁盘存储按照组的方式进行命名、管理和分配,例如按照使用用途进行定义:“development”和“sales”,而不是使用物理磁盘名“sda”和“sdb”。

多个磁盘/分区/raid–>多个物理卷PV–>合成卷组VG–>从VG划分出逻辑卷LV–>格式化LV,挂载使用。
4个基本的逻辑卷概念。
①PE (Physical Extend) 物理拓展
②PV (Physical Volume) 物理卷
③VG (Volume Group) 卷组
④LV (Logical Volume) 逻辑卷
lvm 操作
| 功能 | PV管理命令 | VG管理命令 | LV管理命令 |
|---|---|---|---|
| scan 扫描 | pvscan | vgscan | lvscan |
| create 创建 | pvcreate | vgcreate | lvcreate |
| display 显示 | pvdisplay | vgdisplay | lvdisplay |
| remove 移除 | pvremove | vgremove | lvremove |
| extend 扩展 | vgextend | lvextend | |
| reduce 减少 | vgreduce | lvreduce |
# 安装
$ sudo yum install lvm2
lvcreate 使用
# 命令行使用
[root@master-01 ~]# lvcreate --help
  lvcreate - Create a logical volume

  Create a linear LV.
  lvcreate -L|--size Size[m|UNIT] VG
	[ -l|--extents Number[PERCENT] ]
	[    --type linear ]
	[ COMMON_OPTIONS ]
	[ PV ... ]

 ......
 Create a thin LV, first creating a thin pool for it,
  where the new thin pool is named by the --thinpool arg.
  lvcreate --type thin -V|--virtualsize Size[m|UNIT] -L|--size Size[m|UNIT] --thinpool LV_new
	[ -l|--extents Number[PERCENT] ]
	[ -T|--thin ]
	[ -c|--chunksize Size[k|UNIT] ]
	[ -i|--stripes Number ]
	[ -I|--stripesize Size[k|UNIT] ]
	[    --poolmetadatasize Size[m|UNIT] ]
	[    --poolmetadataspare y|n ]
	[    --discards passdown|nopassdown|ignore ]
	[    --errorwhenfull y|n ]
	[ COMMON_OPTIONS ]
	[ PV ... ]
lvs 使用
root@node1:~# lvs --help
  lvs - Display information about logical volumes

  lvs
	[ -H|--history ]
	[ -a|--all ]
	[ -o|--options String ]
	[ -S|--select String ]
	[ -O|--sort String ]
	[    --segments ]
	[    --aligned ]
	[    --binary ]
	[    --configreport log|vg|lv|pv|pvseg|seg ]
	[    --foreign ]
	[    --ignorelockingfailure ]
	[    --logonly ]
	[    --nameprefixes ]
	[    --noheadings ]
	[    --nosuffix ]
	[    --readonly ]
	[    --reportformat basic|json ]
	[    --rows ]
	[    --separator String ]
	[    --shared ]
	[    --unbuffered ]
	[    --units [Number]r|R|h|H|b|B|s|S|k|K|m|M|g|G|t|T|p|P|e|E ]
	[    --unquoted ]
	[ COMMON_OPTIONS ]
	[ VG|LV|Tag ... ]

root@node1:~# lvs
  LV        VG        Attr       LSize   Pool Origin Data%  Meta%  Move Log Cpy%Sync Convert
  ubuntu-lv ubuntu-vg -wi-ao---- <74.00g
Attr 列通过 6 个字符 描述逻辑卷的 类型、权限、分配策略、固定状态、运行状态和设备状态. 详细 man lvs
业务中使用
func ListLVMLogicalVolume() ([]LogicalVolume, error) {
	args := []string{
		"--options", "lv_all,vg_name,segtype",
		"--reportformat", "json",
		"--units", "b",
	}
	output, _, err := RunCommandSplit(LVList, args...)
	if err != nil {
		klog.Errorf("lvm: error while running command %s %v: %v", LVList, args, err)
		return nil, err
	}

	return decodeLvsJSON(output)
}
pvs 使用
func ListLVMPhysicalVolume() ([]PhysicalVolume, error) {
	if err := ReloadLVMMetadataCache(); err != nil {
		return nil, err
	}

	args := []string{
		"--options", "pv_all,vg_name",
		"--reportformat", "json",
		"--units", "b",
	}
	output, _, err := RunCommandSplit(PVList, args...)
	if err != nil {
		klog.Errorf("lvm: error while running command %s %v: %v", PVList, args, err)
		return nil, err
	}

	return decodePvsJSON(output)
}
建立物理卷和卷组: 增加了一块硬盘/dev/sdb, 创建三个分区,并建立三个物理卷 ,三个物理卷中前两个属于一个卷组VolGroup_data,最后一个属于卷组VolGroup_log.
整个LVM的工作原理:
(1)物理磁盘被格式化为PV,空间被划分为一个个的PE
(2)不同的PV加入到同一个VG中,不同PV的PE全部进入到了VG的PE池内
(3)LV基于PE创建,大小为PE的整数倍,组成LV的PE可能来自不同的物理磁盘
(4)LV直接可以格式化后挂载使用
(5)LV的扩充缩减实际上就是增加或减少组成该LV的PE数量,其过程不会丢失原始数据
# 1 创建分区

# 2 物理卷的创建(pvcreate): /dev/sdb1,/dev/sdb2, /dev/sdb3由分区转换成了物理卷
[root@localhost ~]# pvcreate /dev/sdb{1,2,3}
Writing physical volume data to disk "/dev/sdb1"
Physical volume "/dev/sdb1" successfully created
Writing physical volume data to disk "/dev/sdb2"
Physical volume "/dev/sdb2" successfully created
Writing physical volume data to disk "/dev/sdb3"
Physical volume "/dev/sdb3" successfully created


# 3 卷组的创建(vgcreate): 每创建一个VG,其会在/dev目录下创建一个以该VG名字命名的文件夹
[root@localhost ~]# vgcreate VolGroup_data /dev/sdb1 /dev/sdb2
Volume group "VolGroup_data" successfully created
[root@localhost ~]# vgcreate VolGroup_log /dev/sdb3
Volume group "VolGroup_log" successfully created
建立逻辑卷并使用:
- VolGroup_log 中建立一个逻辑分区lv_log,文件系统为Ext4,大小为300MB,挂载点为/da/log。
- VolGroup_data 中建立一个逻辑分区 lv_data,文件系统为Ext4,大小为1.2GB,挂载点为 /da/data

# 1 建立逻辑分区
[root@localhost ~]# lvcreate -L 300M -n lv_log VolGroup_log
Logical volume "lv_log" created
[root@localhost ~]# lvcreate -L 1.2G -n lv_data VolGroup_data
Rounding up size to full physical extent 1.20 GiB
Logical volume "lv_data" created

# 2 格式化分区(mkfs.ext4 /dev/卷组名/逻辑分区)
[root@localhost ~]# mkfs.ext4 /dev/VolGroup_log/lv_log
[root@localhost ~]# mkfs.ext4 /dev/VolGroup_data/lv_data


# 3 挂载分区(mount /dev/卷组名/逻辑分区 挂载点)
[root@localhost ~]# mkdir -p /da/log /da/data
[root@localhost ~]# mount /dev/VolGroup_log/lv_log /da/log
[root@localhost ~]# mount /dev/VolGroup_data/lv_data /da/data
卸载操作
# 1 卸载文件系统 umount

# 2 删除逻辑卷: lvremove  逻辑卷名

# 3 删除卷组:vgremove 卷组名

# 4 删除物理卷: pvremove /dev/sd*
csi lvm-localpv 中使用
pv节点调度策略
// scheduling algorithm constants
const (
	// pick the node where less volumes are provisioned for the given volume group
	VolumeWeighted = "VolumeWeighted"

	// pick the node where total provisioned volumes have occupied less capacity from the given volume group
	CapacityWeighted = "CapacityWeighted"

	// pick the node which is less loaded space wise
	// this will be the default scheduler when none provided
	SpaceWeighted = "SpaceWeighted"
)
CreateVolume 实现创建/删除 volume 的功能
func (cs *controller) CreateVolume(
	ctx context.Context,
	req *csi.CreateVolumeRequest,
) (*csi.CreateVolumeResponse, error) {
    // 校验请求
	if err := cs.validateVolumeCreateReq(req); err != nil {
		return nil, status.Error(codes.InvalidArgument, err.Error())
	}

	params, err := NewVolumeParams(req.GetParameters())
	if err != nil {
		return nil, status.Errorf(codes.InvalidArgument,
			"failed to parse csi volume params: %v", err)
	}

	volName := strings.ToLower(req.GetName())
	size := getRoundedCapacity(req.GetCapacityRange().GetRequiredBytes())
	contentSource := req.GetVolumeContentSource()

	var vol *lvmapi.LVMVolume
	if contentSource != nil && contentSource.GetSnapshot() != nil {
		return nil, status.Error(codes.Unimplemented, "")
	} else if contentSource != nil && contentSource.GetVolume() != nil {
		return nil, status.Error(codes.Unimplemented, "")
	} else {
		// mark volume for leak protection if pvc gets deleted
		// before the creation of pv.
		var finishCreateVolume func()
		if finishCreateVolume, err = cs.leakProtection.BeginCreateVolume(volName,
			params.PVCNamespace, params.PVCName); err != nil {
			return nil, err
		}
		defer finishCreateVolume()
        // 创建 LVM volume
		vol, err = CreateLVMVolume(ctx, req, params)
	}

	if err != nil {
		return nil, err
	}
	sendEventOrIgnore(params.PVCName, volName,
		strconv.FormatInt(int64(size), 10),
		analytics.VolumeProvision)

	topology := map[string]string{lvm.LVMTopologyKey: vol.Spec.OwnerNodeID}
	cntx := map[string]string{
		lvm.VolGroupKey:       vol.Spec.VolGroup,
		lvm.OpenEBSCasTypeKey: lvm.LVMCasTypeName,
		lvm.FormatOptionsKey:  params.FormatOptions,
	}

	// 创建 pv
	return csipayload.NewCreateVolumeResponseBuilder().
		WithName(volName).
		WithCapacity(size).
		WithTopology(topology).
		WithContext(cntx).
		WithContentSource(contentSource).
		Build(), nil
}

func CreateLVMVolume(ctx context.Context, req *csi.CreateVolumeRequest,
	params *VolumeParams) (*lvmapi.LVMVolume, error) {
	volName := strings.ToLower(req.GetName())
	capacity := strconv.FormatInt(getRoundedCapacity(
		req.GetCapacityRange().RequiredBytes), 10)

	vol, err := lvm.GetLVMVolume(volName)
	if err != nil {
		if !k8serror.IsNotFound(err) {
			return nil, status.Errorf(codes.Aborted,
				"failed get lvm volume %v: %v", volName, err.Error())
		}
		vol, err = nil, nil
	}

	if vol != nil {
		// 已经存在
	}

	nmap, err := getNodeMap(params.Scheduler, params.VgPattern)
	if err != nil {
		return nil, status.Errorf(codes.Internal, "get node map failed : %s", err.Error())
	}

	// 运行调度器选择节点,依赖 Lvmnode 信息
	selected := schd.Scheduler(req, nmap)

	if len(selected) == 0 {
		return nil, status.Error(codes.Internal, "scheduler failed, not able to select a node to create the PV")
	}

	owner := selected[0]
	klog.Infof("scheduling the volume %s/%s on node %s",
		params.VgPattern.String(), volName, owner)

	// 创建 Lvmvolumes 资源
	volObj, err := volbuilder.NewBuilder().
		WithName(volName).
		WithCapacity(capacity).
		WithVgPattern(params.VgPattern.String()).
		WithOwnerNode(owner).
		WithVolumeStatus(lvm.LVMStatusPending).
		WithShared(params.Shared).
		WithThinProvision(params.ThinProvision).Build()

	if err != nil {
		return nil, status.Error(codes.Internal, err.Error())
	}

	vol, err = lvm.ProvisionVolume(volObj)
	if err != nil {
		return nil, status.Errorf(codes.Internal, "not able to provision the volume %s", err.Error())
	}
	// 等待 lvmVolome 创建成功
	vol, _, err = waitForLVMVolume(ctx, vol)
	return vol, err
}
每个 node 控制器 sync lvmVolume 处理
func (c *VolController) syncVol(vol *apis.LVMVolume) error {
	var err error
	// LVM Volume should be deleted. Check if deletion timestamp is set
	if c.isDeletionCandidate(vol) {
		err = lvm.DestroyVolume(vol)
		if err == nil {
			err = lvm.RemoveVolFinalizer(vol)
		}
		return err
	}

	// if status is Pending then it means we are creating the volume.
	// Otherwise, we are just ignoring the event.
	switch vol.Status.State {
	case lvm.LVMStatusFailed:
		klog.Warningf("Skipping retrying lvm volume provisioning as its already in failed state: %+v", vol.Status.Error)
		return nil
	case lvm.LVMStatusReady:
		klog.Info("lvm volume already provisioned")
		return nil
	}

	// if there is already a volGroup field set for lvmvolume resource,
	// we'll first try to create a volume in that volume group.
	if vol.Spec.VolGroup != "" { // 如果指定了 vg

		// 创建 lvm
		err = lvm.CreateVolume(vol)
		if err == nil {
			return lvm.UpdateVolInfo(vol, lvm.LVMStatusReady)
		}
	}

	// 针对 vol 没有指定 vg 的处理 , 即正则过滤
	vgs, err := c.getVgPriorityList(vol)
	if err != nil {
		return err
	}

	if len(vgs) == 0 {
		err = fmt.Errorf("no vg available to serve volume request having regex=%q & capacity=%q",
			vol.Spec.VgPattern, vol.Spec.Capacity)
		klog.Errorf("lvm volume %v - %v", vol.Name, err)
	} else {
		for _, vg := range vgs {
			// first update volGroup field in lvm volume resource for ensuring
			// idempotency and avoiding volume leaks during crash.
			if vol, err = lvm.UpdateVolGroup(vol, vg.Name); err != nil {
				klog.Errorf("failed to update volGroup to %v: %v", vg.Name, err)
				return err
			}
			if err = lvm.CreateVolume(vol); err == nil {
				return lvm.UpdateVolInfo(vol, lvm.LVMStatusReady)
			}
		}
	}

	// In case no vg available or lvm.CreateVolume fails for all vgs, mark
	// the volume provisioning failed so that controller can reschedule it.
	vol.Status.Error = c.transformLVMError(err)
	return lvm.UpdateVolInfo(vol, lvm.LVMStatusFailed)
}
真正创建 lv
// https://github.com/openebs/lvm-localpv/blob/9e0ac5b4a8bacb9dc771d8d6c33293070df71507/pkg/lvm/lvm_util.go

const (
    VGCreate = "vgcreate"
    VGList   = "vgs"

    LVCreate = "lvcreate"
    LVRemove = "lvremove"
    LVExtend = "lvextend"
    LVList   = "lvs"

    PVList = "pvs"
    PVScan = "pvscan"

    YES        = "yes"
    LVThinPool = "thin-pool"
)

// 创建卷
func CreateVolume(vol *apis.LVMVolume) error {
	volume := vol.Spec.VolGroup + "/" + vol.Name

	volExists, err := CheckVolumeExists(vol)
	if err != nil {
		return err
	}
	if volExists {
		klog.Infof("lvm: volume (%s) already exists, skipping its creation", volume)
		return nil
	}

	args := buildLVMCreateArgs(vol)
	out, _, err := RunCommandSplit(LVCreate, args...)

	if err != nil {
		err = newExecError(out, err)
		klog.Errorf(
			"lvm: could not create volume %v cmd %v error: %s", volume, args, string(out),
		)
		return err
	}
	klog.Infof("lvm: created volume %s", volume)

	return nil
}

func buildLVMCreateArgs(vol *apis.LVMVolume) []string {
	var LVMVolArg []string

	volume := vol.Name
	size := vol.Spec.Capacity + "b"
	// thinpool name required for thinProvision volumes
	pool := vol.Spec.VolGroup + "_thinpool"

	if len(vol.Spec.Capacity) != 0 {
		// check if thin pool exists for given volumegroup requested thin volume
		if strings.TrimSpace(vol.Spec.ThinProvision) != YES {
			LVMVolArg = append(LVMVolArg, "-L", size)
		} else if !lvThinExists(vol.Spec.VolGroup, pool) {
			// thinpool size can't be equal or greater than actual volumegroup size
			LVMVolArg = append(LVMVolArg, "-L", getThinPoolSize(vol.Spec.VolGroup, vol.Spec.Capacity))
		}
	}

	// command to create thinpool and thin volume if thinProvision is enabled
	// `lvcreate -L 1G -T lvmvg/mythinpool -V 1G -n thinvol`
	if strings.TrimSpace(vol.Spec.ThinProvision) == YES {
		LVMVolArg = append(LVMVolArg, "-T", vol.Spec.VolGroup+"/"+pool, "-V", size)
	}

	if len(vol.Spec.VolGroup) != 0 {
		LVMVolArg = append(LVMVolArg, "-n", volume)
	}

	if strings.TrimSpace(vol.Spec.ThinProvision) != YES {
		LVMVolArg = append(LVMVolArg, vol.Spec.VolGroup)
	}

	// -y is used to wipe the signatures before creating LVM volume
	LVMVolArg = append(LVMVolArg, "-y")
	return LVMVolArg
}
NodePublishVolume 将其挂载到 pod 中
func (ns *node) NodePublishVolume(
	ctx context.Context,
	req *csi.NodePublishVolumeRequest,
) (*csi.NodePublishVolumeResponse, error) {

	var (
		err error
	)

	if err = ns.validateNodePublishReq(req); err != nil {
		return nil, err
	}

	vol, mountInfo, err := GetVolAndMountInfo(req)
	if err != nil {
		_ = vol
		_ = mountInfo
		return nil, status.Error(codes.Internal, err.Error())
	}

	podLVinfo, err := getPodLVInfo(req)
	if err != nil {
		_ = podLVinfo
		klog.Warningf("PodLVInfo could not be obtained for volume_id: %s, err = %v", req.VolumeId, err)
	}
	switch req.GetVolumeCapability().GetAccessType().(type) {
	case *csi.VolumeCapability_Block:
		// attempt block mount operation on the requested path
		err = lvm.MountBlock(vol, mountInfo, podLVinfo)
	case *csi.VolumeCapability_Mount:
		// attempt filesystem mount operation on the requested path
		err = lvm.MountFilesystem(vol, mountInfo, podLVinfo)
	}

	if err != nil {
		return nil, err
	}

	return &csi.NodePublishVolumeResponse{}, nil
}
删除卷
// https://github.com/openebs/lvm-localpv/blob/9e0ac5b4a8bacb9dc771d8d6c33293070df71507/pkg/lvm/lvm_util.go

// 删除卷
func DestroyVolume(vol *apis.LVMVolume) error {
	// 判断存在性
	volExists, err := CheckVolumeExists(vol)
	if err != nil {
		return err
	}
	if !volExists {
		klog.Infof("lvm: volume (%s) doesn't exists, skipping its deletion", volume)
		return nil
	}
    // 清除文件系统
	err = removeVolumeFilesystem(vol)
	if err != nil {
		return err
	}

	// 删除 lv
	args := buildLVMDestroyArgs(vol)
	out, _, err := RunCommandSplit(LVRemove, args...)

	if err != nil {
		klog.Errorf(
			"lvm: could not destroy volume %v cmd %v error: %s", volume, args, string(out),
		)
		return err
	}

	klog.Infof("lvm: destroyed volume %s", volume)

	return nil
}

func removeVolumeFilesystem(lvmVolume *apis.LVMVolume) error {
	devicePath := filepath.Join(DevPath, lvmVolume.Spec.VolGroup, lvmVolume.Name)

	// wipefs erases the filesystem signature from the lvm volume
	// -a    wipe all magic strings
	// -f    force erasure
	// Command: wipefs -af /dev/lvmvg/volume1
	cleanCommand := exec.Command(BlockCleanerCommand, "-af", devicePath)
	output, err := cleanCommand.CombinedOutput()
	if err != nil {
		return errors.Wrapf(
			err,
			"failed to wipe filesystem on device path: %s resp: %s",
			devicePath,
			string(output),
		)
	}
	klog.V(4).Infof("Successfully wiped filesystem on device path: %s", devicePath)
	return nil
}
lvm 监控
# Total Provisioned Capacity : vgs -o vg_size <vg_name>
root@node4:~#  vgs -o vg_size ubuntu-vg
  VSize
  <98.00g

# Total Free Capacity :vgs -o vg_free <vg_name>
root@node4:~# vgs -o vg_free ubuntu-vg
  VFree
  9.00g

# Total Used Capacity=   Total Provisioned Capacity - Total Free Capacity

# Total Allocated Capacity : lvs -o lv_size <lv_full_name>
root@node4:~# lvs -o lv_size ubuntu-vg/ubuntu-lv
  LSize
  <89.00g

# Total Used Capacity : lvs -o lv_size,data_percent,snap_percent,metadata_percent <lv_full_name>
RAID(Redundant Array of Independent Disks 独立硬盘冗余阵列)
旧称廉价磁盘冗余阵列(Redundant Array of Inexpensive Disks),简称磁盘阵列。其基本思想就是把多个相对便宜的硬盘组合起来,成为一个硬盘阵列组,使性能达到甚至超过一个价格昂贵、容量巨大的硬盘。
基本概念
/proc/mdstat: 当前md(软RAID)的状态信息
// github.com/prometheus/procfs@v0.8.0/mdstat.go
func (fs FS) MDStat() ([]MDStat, error) {
	data, err := os.ReadFile(fs.proc.Path("mdstat"))
	if err != nil {
		return nil, err
	}
	mdstat, err := parseMDStat(data)
	if err != nil {
		return nil, fmt.Errorf("error parsing mdstat %q: %w", fs.proc.Path("mdstat"), err)
	}
	return mdstat, nil
}
type MDStat struct {
	// Name of the device.
	Name string
	// activity-state of the device.
	ActivityState string
	// Number of active disks.
	DisksActive int64
	// Total number of disks the device requires.
	DisksTotal int64
	// Number of failed disks.
	DisksFailed int64
	// Number of "down" disks. (the _ indicator in the status line)
	DisksDown int64
	// Spare disks in the device.
	DisksSpare int64
	// Number of blocks the device holds.
	BlocksTotal int64
	// Number of blocks on the device that are in sync.
	BlocksSynced int64
	// progress percentage of current sync
	BlocksSyncedPct float64
	// estimated finishing time for current sync (in minutes)
	BlocksSyncedFinishTime float64
	// current sync speed (in Kilobytes/sec)
	BlocksSyncedSpeed float64
	// Name of md component devices
	Devices []string
}
/etc/mdadm.conf : mdadm的配置文件
Active devices: RAID中的活动组件设备
Faulty device: RAID中失效的设备
Spare device: RAID中热备盘
Device Names: RAID设备名、标准格式是”/dev/mdNN”或者”/dev/md/NN”
md: Multiple Devices虚拟块设备(利用底层多个块设备虚拟出一个新的虚拟块设备)。
md driver: MD的驱动
硬 RAID, 全软 RAID, 半软 RAID
根据事先方式不同,RAID 分为软件磁盘阵列(软RAID)和硬件磁盘阵列(硬 RAID) 以及 硬件辅助磁盘阵列(半软、半硬)三种类型
硬件磁盘阵列(Hardware RAID) : 简单来说就是全部通过用硬件来实现RAID功能的就是硬RAID. 对于操作系统而言,他只能识别到由RAID控制器配置后的虚拟磁盘,而无法识别到组成RAID的各个成员盘
软件磁盘阵列(Software RAID) : 反而言之,通过用操作系统来完成RAID功能的就是软RAID, 软RAID的各个成员盘对于操作系统来说是可见的,但操作系统并不把各个成员盘呈现给用户,而只是把通过软件层配置好的虚拟RAID卷呈现给用户,使用户可以像使用一个普通磁盘一样使用RAID卷。
硬件辅助磁盘阵列(Hardware-Assisted RAID):与硬 RAID 和 全软 RAID 相比,半软 RAID需要一张RAID卡,以及厂商所提供的驱动程序。 但是半软半硬RAID 缺乏自己的I/O 处理芯片,所以这方面的工作仍要由CPU 与驱动程序来完成
raid 版本
raid 0

RAID 0亦称条带化(Stripe)或分条(Striping)。它将两个以上的磁盘并联起来,成为一个大容量的磁盘。 在存放数据时,分段后分散存储在这些磁盘中,因为读写时都可以并行处理,所以在所有的级别中,RAID 0的速度是最快的。 但是RAID 0既没有冗余功能,也不具备容错能力,如果一个磁盘(物理)损坏,所有数据都会丢失,危险程度与JBOD( Just a Bunch Of Disks)相当.
假设我们有2个磁盘驱动器,例如,如果我们将数据“TECMINT”写到逻辑卷中,“T”将被保存在第一盘中,“E”将保存在第二盘,‘C’将被保存在第一盘,“M”将保存在第二盘,它会一直继续此循环过程。(实际上不可能按字节切片,是按数据块切片的。)
raid 1

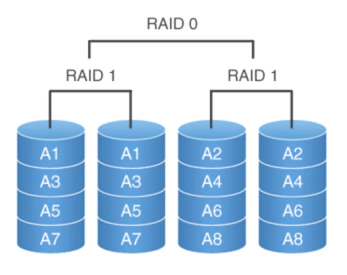
混合 raid: raid 10

raid 操作
mdadm 是一个用于创建、管理、监控RAID设备的工具,它使用Linux中的md驱动.
# mdadm 使用
[root@master-01 ~]# yum install -y mdadm
[root@master-01 ~]# mdadm --help
mdadm is used for building, managing, and monitoring
Linux md devices (aka RAID arrays)
Usage: mdadm --create device options...
            Create a new array from unused devices.
       mdadm --assemble device options...
            Assemble a previously created array.
       mdadm --build device options...
            Create or assemble an array without metadata.
       mdadm --manage device options...
            make changes to an existing array.
       mdadm --misc options... devices
            report on or modify various md related devices.
       mdadm --grow options device
            resize/reshape an active array
       mdadm --incremental device
            add/remove a device to/from an array as appropriate
       mdadm --monitor options...
            Monitor one or more array for significant changes.
       mdadm device options...
            Shorthand for --manage.
Any parameter that does not start with '-' is treated as a device name
or, for --examine-bitmap, a file name.
The first such name is often the name of an md device.  Subsequent
names are often names of component devices.

 For detailed help on the above major modes use --help after the mode
 e.g.
         mdadm --assemble --help
 For general help on options use
         mdadm --help-options

# 查看查看RAID信息
$ mdadm --query --detail /dev/md0
/dev/md0:
           Version : 1.2
     Creation Time : Thu Mar 27 11:34:48 2025
        Raid Level : raid10
        Array Size : 9376453632 (8942.08 GiB 9601.49 GB)
     Used Dev Size : 3125484544 (2980.69 GiB 3200.50 GB)
      Raid Devices : 6
     Total Devices : 6
       Persistence : Superblock is persistent

     Intent Bitmap : Internal

       Update Time : Thu Mar 27 11:43:28 2025
             State : active, resyncing
    Active Devices : 6
   Working Devices : 6
    Failed Devices : 0
     Spare Devices : 0

            Layout : near=2
        Chunk Size : 512K

Consistency Policy : bitmap

     Resync Status : 1% complete

              Name : 主机名:0  (local to host 主机名)
              UUID : 79ae7670:6937e95c:f53b7106:2d16618f
            Events : 608

    Number   Major   Minor   RaidDevice State
       0     259        5        0      active sync set-A   /dev/rd0
       1     259        0        1      active sync set-B   /dev/rd1
       2     259        1        2      active sync set-A   /dev/rd2
       3     259        2        3      active sync set-B   /dev/rd3
       4     259        3        4      active sync set-A   /dev/rd4
       5     259        4        5      active sync set-B   /dev/rd5

## Create模式:使用空闲的设备创建一个新的阵列,每个设备具有元数据块
## 用法:mdadm –create md-device –chunk=X –level=Y –raid-devices=Z devices
## 使用sda1和sdb1创建RAID0,条带大小是64KB。
mdadm –create /dev/md0 –chunk=64 –level=0 –raid-devices=2 /dev/sda1 /dev/sdb1


# 停止md0的运行
mdadm –stop /dev/md0

# 清除组件设备sda1中超级块的信息
mdadm — zero-superblock /dev/sda1


# 创建配置文件
mdadm –-detail –scan >> mdadm.conf
# 说明:查看当前所有RAID的状态
cat /proc/mdstat
创建raid
创建raid 0
# 1 安装 mdadm
yum install mdadm -y

# 2 确认硬盘数量
ls -l /dev | grep sd

# 3 确认硬盘没有被 raid 使用
mdadm --examine /dev/sd[b-c]

# 4 创建分区: parted 工具

# 5  验证这两个驱动器是否正确定义 RAID
mdadm --examine /dev/sd[b-c]
mdadm --examine /dev/sd[b-c]1

# 6 创建 RAID md 设备: mdadm -C /dev/md0 -l raid0 -n 2 /dev/sd[b-c]1
mdadm --create /dev/md0 --level=stripe --raid-devices=2 /dev/sd[b-c]1

# 7 查看 RAID 级别,设备和阵列的使用状态
cat /proc/mdstat

# 8 保存 RAID 配置 mdadm -E -s -v >> /etc/mdadm.conf
mdadm --detail --scan --verbose >> /etc/mdadm.conf
卸载 raid
# 1 卸载挂载中的设备
umount /dev/md0

# 2 停止 raid 服务
mdadm --stop /dev/md0


# 3 卸载 raid10 中所有磁盘信息
mdadm --misc --zero-superblock /dev/sdb
mdadm --misc --zero-superblock /dev/sdc
mdadm --misc --zero-superblock /dev/sdd
mdadm --misc --zero-superblock /dev/sde

# 4 删除 raid 的配置文件
rm /etc/mdadm.conf

# 5 清除开机挂载信息 /etc/fstab
参考
- https://www.diskinternals.com/raid-recovery/how-to-remove-software-raid-with-mdadm/
- https://linux.die.net/man/8/dmsetup
- https://github.com/topolvm/topolvm/
- https://github.com/openebs/lvm-localpv
- LVM的基本概念和部署
- fdisk,gdisk,parted 三种分区工具比较
- LVM管理
- lvm.conf配置文件描述
- LVM精简卷(Thinly-Provisioned Logical Volumes)操作
- RAID及mdadm命令
- mdadm命令
- 使用 mdadm 工具创建软 RAID 0
- udev和rules使用规则
- dmsetup 命令